Hiking Gear Reviews & Guides
The 8 Best Big Bear Hiking Trails

100-miles northeast of Los Angeles sits Big Bear Lake, a mountain resort community of 21,000 people nestled in the middle of the San Bernardino National Forest. There is a wealth of recreational opportunities in the resort village and a freshwater lake which is great for fishing. With 300 days of sunshine on average per year, Big Bear is an excellent place for hikers to flex their trekking muscles on the hiking trails that course through the San Bernardino National Forest. There are hiking trails for hikers of all experience levels so families and those new to hiking can always find something to suit their skill level and offer similarly beautiful views to the more complicated hiking trails.
39-miles of the Pacific Crest Trail cut across Big Bear and hikers have plenty of opportunities to hike sections of it without engaging in the months of training and preparation required for a thru-hike. The stretch of the Pacific Crest Trail that goes from I-10 to I-15 is replete with spectacular views and puts hikers within striking distance of all that Big Bear Lake has to offer, including Big Bear Hostel, a well-known stop off where thru-hikers can receive care packages and re-up on their hiking supplies. Day hikers or overnight patrons of Big Bear Lake’s various hiking trails can add Big Bear Hostel to their itinerary if they want to rub shoulders with long-distance hikers or enjoy classic diner hot plates after they come off the trail.

Big Bear Lake hiking trails offer a grand viewpoint on snow-covered mountains and alpine hills.
Hikers don’t have to pay anything to use any of the hiking trails at Big Bear Lake, but if you want to use any of the parking lots you will have to get an Adventure Pass from the U.S. Forest Service. The price of an Adventure Pass can vary depending on which parking lot you want to use and what kind of trip you’re planning.
For hikers who might want to add other outdoor activities to their hiking trip can check out Big Bear Resort in Holcomb Valley, the ski resort, mountain biking, or any of many other possible outdoor activities which can be found and coordinated at the Big Bear Discovery Center in Fawnskin, California. Almost any outdoor activity you can think of can be found somewhere in Big Bear Valley at some point in the year.
Read on for a look at the best hiking trails in Big Bear Lake that offer oftentimes pet-friendly treks with doable round-trip completion times to take in the wildflowers, wildlife, and the best views of the lake you can find. Take a nice day hike or make a dedicated vacation to Big Bear Lake to enjoy outdoor activities and the beautiful views on the many Big Bear hiking trails.
1. Castle Rock Trail
With an 833-foot elevation gain, this 5.2-mile round trip out-and-back hiking trail has lots to offer hikers in Big Bear Lake. It’s quite steep but still very doable even in the winter, although some hikers prefer to have microspikes or trekking poles along with them. Hikers will have to boulder-hop to get through this trail, but not so much that it is impossible for hikers who are new to it.
The views of the lake on the Castle Rock Trail are some of the nicest you can get in Big Bear Valley and accessible after only 20 minutes or so of hiking. There are also some side trails if this brief central trail doesn’t hold your attention for long enough or if you want to tie a hike on the Castle Rock Trail in with one of the many other hiking trails in Big Bear Lake.
If you do decide to go to this particular hiking trail while you’re in Big Bear Lake, there are two entrances you can use. The north entrance off Big Bear Boulevard is the more common one to use, but the south entrance starts the hike off with much easier terrain and is less crowded than the north entrance.
There is a parking lot but it fills up on busy days, so try to show up in good time to find a space if that will be a requirement for you. Hikers on this trail can also consider taking the trail markers that point to Bluff Lake for a longer hike. Dogs are allowed on this trail without any restrictions.
Pros:
- Challenging elevation gain
- Beautiful views from Castle Rock
- Wide variety of side hiking trails
- Two entrances to avoid crowds
- Parking lot at trailhead
- Dogs allowed
Cons:
- Some bouldering required
- Steep near the north entrance
2. Pine Knot Trail to Grand View Point
For hikers who want to add a water feature to their hiking trail, the Pine Knot Trail is a solid choice. From the trailhead at the Aspen Glen Picnic Area, this 10.6-mile hiking trail has an elevation gain of about 1,095 feet. It’s usually very quiet and tranquil, although hikers are likely to meet some bikers and equestrian traffic from time to time. San Gorgonio Mountain, the tallest peak in California south of the Sierra Nevada mountains, is visible alongside Catalina Island from a panoramic point at the terminus of this hiking trail. Breathtaking lake views accompany both, this being Big Bear Lake and all. Wildflowers are plentiful in the summer months.
In order to reach Grand View Point, hikers should continue along 1EO1 beyond its intersection with 2N08 and hike about a ¼-mile distance along the perpendicular path at 2N10. 2N10 can also take hikers to Aspen Glen, as can the Skyline Trail and Plantation Trail, for hikers who are interested in adding ridge hiking to their itinerary. Dogs are permitted on this hiking trail but they must be kept on a leash.
There is a parking lot nearby and a restroom at the trailhead for hikers who don’t want to answer the call of nature in nature necessarily. Another convenient tip is that hikers can buy a Forest Service Adventure Pass at a 7-Eleven that’s quite close to this trail. There are many ways to diversify your hiking experience on this trail. It isn’t too difficult but it is challenging enough to stay interesting and the views of the lake on the way down are pretty nice.
Pros:
- Lake on the trail
- Mountain biking accepted
- Views of San Gorgonio and Catalina Island
- Wildflowers in summertime
- Variety of side hiking trails
- Parking lot and restroom
- Adventure pass available nearby
Cons:
- Views of the lake on descent only
- Dusty with lack of precipitation
3. Cougar Crest Trail
The Cougar Crest Trail stretches for a little over 5 miles on a south-facing slope that offers alternating sun and shade to stay regulated while you hike. The elevation gain is just under 900 feet and offers hikers a nice enough leg workout, although at points during the first half of the trail it can get quite steep so adequate ankle support is recommended.
The second half of the trail is made up of steadily rising switchbacks and the going is much easier there. A parking lot and a restroom are available at the trailhead. Beware as you traverse this trail, as there are many outcroppings of small rocks that can trip up hikers who aren’t paying enough attention to their footsteps.
The Cougar Crest Trail intersects the Pacific Crest Trail and the two best places to get views of the lake from this trail are right before the PCT intersection and about ¼-mile after it. One of the nicest features of this trail is that it is really easy to access even when heavy snowfall is hitting Big Bear Lake.
Hikers can use the parking lot at the trailhead or they can park for free without an Adventure Pass at the Big Bear Discovery Center and then walk 0.6 miles westward along Highway 38 to reach the Cougar Crest Trail. The parking lot at the Big Bear Discovery Center is only available until 6 P.M. so plan ahead and don’t get distracted by some of the side trails you might find along the way.
Pros:
- Regular shade for summer hiking
- Doable elevation gain
- Parking lot and restroom available
- Intersects the Pacific Crest Trail
- Free parking at the Big Bear Discovery Center
Cons:
- Occasionally uneven with rocky outcroppings
- Free parking lot has limited hours

Try to catch one of the unbeatable views of the Big Bear Lake at golden hour.
4. Alpine Pedal Path Trail
At just under 5.5 miles and with an elevation gain of just 285 feet, this hiking trail is super easy and perfect for groups that have less experienced hikers with them. Dogs are allowed but must be kept on a leash. This route hugs the lake which makes fishing possible and bird watching is also viable. For hikers traveling with small children, this trail is ideal. You can stop at the nearby Big Bear Discovery Center after you finish this hike.
There are picnic tables and the pathway is partially paved so hikers who aren’t looking for much exertion but do want up-close views of the lake should consider this easy, low-elevation hiking trail. Not only great for hiking, this trail is also popular year-round for runners and bikers too. It’s on the quiet side of the lake but it won’t be nearly as quiet as the more remote-reaching hiking trails since it’s so close to the road and some of Big Bear Lake’s through-traffic headed to other trailheads.
Pros:
- Short and sweet, low elevation gain
- Dogs allowed
- Right beside Big Bear Lake
- Near Big Bear Discovery Center
- Great for runners and bikers
Cons:
- Not so challenging for experienced hikers
- Not as quiet or peaceful as more remote trails
5. Bertha Peak via Holcomb Valley Road
This 2 ¼-mile hiking trail is surprisingly stunning visually considering its comparatively short length. Bertha Peak is on the Sierra Club’s Hundred Peaks Section List just like some of the other peaks in Big Bear Lake. Bertha Peak is accessible via the Cougar Crest Trail and the Pacific Crest Trail, but the views of it from Holcomb Valley Road on this trail are really something to see in their own right.
Views of the lake and the San Gorgonio Wilderness are also stellar on this hiking trail. With a 718-foot elevation gain, this trail can be steep, especially in the .4 of a mile but not so much along the rest of the trail. It intersects the Pacific Crest Trail for hikers who would like to see a section of it but only have a few hours to spend in Big Bear Valley.
When you reach Bertha’s Peak on this trail, you might experience lots of loose rock that can make the way a little bit more difficult, but if you’re prepared for it it shouldn’t be a huge problem. Hikers can use a parking lot located on Holcomb Valley road at the beginning of the Pacific Crest Trail section but will need a Forest Service Adventure Pass to do so.
Mountain biking is allowed on the main trail but not on the Pacific Crest Trail. Hikers should consider adding about a half-mile to this hike by starting out at the Big Bear Discovery Center. Some hikers take issues with the radio towers that dot the vistas visible from this hiking trail, but they aren’t gargantuan and likely won’t bother hikers who can appreciate the rest of the stunning natural beauty surrounding them.
Pros:
- Stellar views of the lake and surrounding peaks
- Mostly level, easy elevation gain
- PCT intersection
- Parking lot available
- Big Bear Discovery Center nearby
Cons:
- Loose rock near Bertha’s Peak
- No mountain biking on the PCT
- Radio towers visible
6. Snow Summit Log Chute Loop
Clocking in at about 2.6 miles, this hiking trail is brief but in that short distance is a 1,217-foot elevation gain that makes this trail much steeper than some hikers might suspect. That elevation gain also makes this trail ideal for skiing when there is fresh powder on the ground. Snow Summit is a great place to see the sun setting over Big Bear Lake and worth every foot of the steep elevation gain.
The round-trip will not take hikers more than a couple of hours and there are more trails nearby so it can be paired with others or enjoyed as a standalone trail for hikers who don’t have much time to spend in Big Bear Valley. There are also chair lifts available for hikers who decide they can’t be bothered with the descent for one reason or another. The summit has a restaurant for hikers to regain lost calories or plan a fun lunch time excursion with a little physical activity thrown in.
Pros:
- Amazing views
- Restaurant and chair lift
- Ideal for skiing
- Connects with other trails at Snow Summit
Cons:
- Brief on its own
- Steep and sometimes slippery

Big Bear Lake is easily accessible by car about an hour’s drive from San Bernardino.
7. Lookout Point via Bluff Lake Nature Reserve
This out-and-back hiking trail is about 4.6 miles long and has an elevation gain of 354 feet, so it isn’t the longest or the steepest climb but it does offer great views of the lake and the right side of the San Gorgonio Wilderness where it begins to slope downward. Bird watching is a favorite secondary outdoor activity along this trail. It’s less popular than most of the trails in Big Bear Lake but it offers many of the same advantages as other trails which is why we feel it bears mentioning here.
If you want to add another 4-miles to the round trip length of this hiking trail, park in the parking lot at the bottom and start at the Castle Rock trailhead. Major highlights of this hiking trail include Bluff Lake, Champion Lodgepole Pine, and various streams and meadows. It’s a great place to take in Big Bear Valley from a further distance so you can really appreciate the scale of the place.
Pros:
- Moderately difficult hike
- Beautiful views of the San Gorgonio Wilderness
- Less crowded
- Extendable distance
Cons:
- Shorter than some other hiking trails
8. Champion Lodgepole Pine via Castle Rock Trail
This hiking trail takes you to the Champion Lodgepole Pine, the world’s largest tree of its species at 110 feet tall and over 450 years old to boot. In addition to this landmark, this hiking trail also features beautiful views and isn’t overly taxing for hikers of all skill levels. If you have between a few hours and a half-day in Big Bear Lake, this is probably the one hike we’d recommend. The Castle Rock section is a little difficult for some hikers but doable for just about everybody.
Any way you turn on this hiking trail will grant you stellar lake views and vistas over surrounding San Bernardino. One thing that must be mentioned is that part of this trail is private property controlled by the Wildlands Conservancy. Their Bluff Lake Reserve is open from 8 AM to 6 PM from May 1 to November 1. Outside of these times, hikers will need permission to traverse the section of this hiking trail that is their private property.
Pros:
- Champion Lodgepole Pine landmark
- Beautiful views, lake views
- Wildlife
Cons:
- Private property concerns
- Some difficulty at the Castle Rock section

Final Verdict:
Overall, Big Bear Lake and the wider Big Bear Valley are chock-full of great hiking trails and unforgettable landmarks like the Champion Lodgepole Pine and San Gorgonio Mountain. Make sure you bring plenty of water if you head to Big Bear Lake since the elevation gain on most of these trails, even the shorter ones, can be killer on the glutes and really take a toll on hikers.
In general, hiking in Big Bear Lake is free, but if you plan on going by car and want to use one of the parking lots there, then you need to work out how to get an Adventure Pass from the Forest Service. They aren’t super expensive, especially if you’re planning on a longer trip to Big Bear Valley.
Like many other hiking trails in other parts of California, the ones in Big Bear Valley offer a combination of wildlife, wildflowers, and magnificent natural vistas that make residents of other states and countries balk in wonder at the variety of the backcountry in the state. A large range of outdoor activities from fishing to skiing to hiking is possible at different parts of the year in Big Bear Lake, making it an advantageous choice for year-round outdoor entertainment.
There are also some comparatively unnatural comforts like restaurants and the Big Bear Discovery Center to help hikers make a proper vacation out of their trip to Big Bear Lake. There’s lots to do and see and very little reason not to go if you can make the trip. When you do, make sure to try out one or several of these Big Bear hiking trails.
Bonus tip: Watch these three hikers tackle the Big Bear Lake to Wrightwood section of the Pacific Crest Trail!

A quality hiking belt is an essential accessory for every outdoor-enthusiast. Whether you use it during day hikes, or for activities such as fishing or hunting, an outdoor belt will keep your clothing and gear safely secured at all times!
In this best hiking belt overview, we’re highlighting the top-rated, best-reviewed options.
We’ve ensured there’s a lightweight match for every preference, and budget, in our best hiking belt review.
From affordable canvas options that offer basic functionality to high-end designs with quick-release buckles, made of premium nylon. Discover the pros and cons of each style and find your ideal waist belt in our overview below:
Best Hiking Belts – Overview
- Best Overall: Arc’teryx Belt
- Best Stretch Belt: Jelt X Adjustable Elastic Belt
- Best High End: Cobra 2-Ply Quick Release Belt
- Best Heavy Duty: Arcade Heavy Duty Elastic Belt
- Best Budget Option: Hoanan Tactical Nylon Belt
And here’s an overview of the best hiking belts on the market today:
[amazon table=”12833″]
[fl_builder_insert_layout id=”19993″]
Best Overall Hiking Belt
1. Arc’teryx Conveyor Belt
[amazon box=”B01MTDMLWT”]
The Arc’teryx Conveyor Belt is a lightweight choice in hiking apparel, and will keep your pants up without weighing you down! The belt is 1.5 inches wide, and comes in 3 lengths: small, medium, and large. Which means there is no cutting down or trimming length required to find a great fit!
Many hiking-enthusiasts swear by the durability, performance, and lightweight comfort of the Arc’teryx Conveyor Belt. It is slightly more expensive than other options on this Best Hiking Belt list, but we think it’s worth the investment. Its excellent quality construction means this belt should last you for many years, even when used for daily wear.
The Arc’teryx Conveyor Belt is made of quality nylon webbing with contrasting stitching for a stylish touch. This synthetic, heavy-duty textured nylon webbing is engineered to withstand all kinds of challenging outdoor conditions. Whether you encounter rain, dust, or even have to wade through a river: this belt can handle it all. As the basic, metal webbing buckle on the belt doesn’t contain any moving or separate parts, it’s also less prone to wear and tear, or damage.
Highly-rated favorite
The Arc’teryx Conveyor Belt is a lightweight favorite amongst hikers, backpackers, and campers; as confirmed by the hundreds of positive customer reviews. Reviews praise the design’s longevity and staying power. Confirming it will hold up your trousers even when your pockets are loaded full, or if you’re wearing heavy-duty, ‘weightier’ fabrics.
A minor con is that some reviewers mention the belt is quite ‘stiff’ at first. And that it may take a few weeks to get it fully broken in, flexible enough for a comfy fit.
PROS
- Nylon webbing
- Great support
- A renowned brand in outdoor gear
CONS
- Can feel a bit ‘stiff’ at first
- Slightly more pricey
[fl_builder_insert_layout id=”19993″]
Best Stretch Hiking Belt
2. Jelt X Adjustable Elastic Stretch Belt for Hiking
[amazon box=”B07XBNB61W”]
Belts are an integral part of our everyday lives. Whether you are going to the office and need to look presentable or are planning on hiking and need that extra level of support, a good and quality belt can come in very handy.
Upon concluding our research, we came across this adjustable belt for hiking by Jelt X, which we believe is amongst the best not only because of its comfortable and low-profile but also because of its ease of use thanks to the magnetic closure mechanism.
Having been made from double elastic with a grippy inner gel, rest assured that your pants will stay in place no matter how intense your hiking gets. The strong, adjustable elastic can fit any individual up to a 40-inch waist (max: men’s 36 pant size and women’s 32/14 pant size).
If you aren’t a particularly big fan of the black, you can also find this hiking belt in navy blue.
PROS
- Unisex
- Made out of durable and stretchy material
CONS
- Only comes in two colors.
[fl_builder_insert_layout id=”19993″]
Best High-End Hiking Belt
3. Cobra 2-Ply Quick Release Klik Belt
[amazon box=”B01M11CBFW”]
The Cobra 2-Ply Quick Release Klik Belt is always ready for action and offers outstanding performance, safety, and support in every kind of outdoor situation. The design adheres to the highest quality standards and uses only top-end materials. The result is an outstanding tactical belt with military-grade durability. Yes, it is by far the most expensive option on this Best Hiking Belt list. But if you only want the very best in outdoor gear, this belt ticks all the right boxes.
Lightweight aluminum buckle
The Cobra 2-Ply Quick Release Klik Belt also comes with a buckle closure made of ultralight 7075 aluminum. As one of the strongest metals available, this aluminum buckle offers all the required support and grip, without weighing you down. This patented Cobra buckle is also super easy to disengage in emergency scenarios, by simply pressing the special side-release buttons for instant opening.
Also good to know: The brand behind this quality product, Klik Belt, is regarded as one of the top choices for tactical-style belts. Its customers include those active in Law Enforcement, Military, SWAT, and even Special Ops. Which serves as a testimony of the brand’s authenticity, quality standard, and reliability. After all, if it’s good enough for our soldiers on challenging missions, it should be good enough for your hiking trips.
Worth the splurge
With hundreds of 5-star reviews, the Cobra 2-Ply Quick Release Klik Belt is the highest-rated options on this Best Hiking Belts list. Hiking fans say the belt strikes the perfect balance between being a rigid, supportive belt, and also a comfortable one. Many customer reviews user superlatives to describe how this belt truly lives up and exceeds, expectation. It is a pricey choice in outdoor gear, but according to the glowing ratings, this will be one of the best investments you’ll ever make.
Are there any cons? Of course, no product is perfect, though this belt comes close. Some hikers report that the aluminum buckle is too large to fit through certain belt loops. Meaning that if you want to wear it with your favorite pair of hiking shorts, you might have to unthread the belt from the buckle first to weave it through, then reattach the buckle. However, mentions of this are rare, so don’t consider it a big risk, but it is something to be aware of.
PROS
- Military-grade materials
- Corrosion-resistant aluminum buckle
- 2-ply construction for extra support
CONS
- Expensive
- Might not thread through smaller belt loops
[fl_builder_insert_layout id=”19993″]
Best Heavy-Duty Hiking Belt
4. Arcade Heavy Duty Elastic Webbing Belt
[amazon box=”B07K6V3G5Q”]
The Arcade Heavy Duty Elastic Webbing Belt scores high marks on performance, comfort, and style. And certainly classifies as one of the best-looking hiking belts available. This makes the belt both suited for active outdoor usage, as well as casual wear, adding to its appeal as a versatile addition to any wardrobe.
Metal-free buckle closure
The belt’s clamp closure buckle is low profile and metal-free. This means the non-metal buckle won’t set off airport security when walking through metal detectors, ideal for those who often travel.
Another big perk of the Arcade Heavy Duty Elastic Web Belt is that this product is fully machine washable. It can even withstand a clothing dryer, making clean-up a breeze. Simply chuck it in with your other laundry and voila: your belt is once again free of dust, dirt, or other residues.
Multiple fun colors and styles
With nearly all 5-star reviews, the Arcade Heavy Duty Elastic Webbing Belt is a firm, or should we say: elasticated, favorite amongst hikers. The design is praised for its outstanding comfort, size adjustability, trendy aesthetics, and value. Minor cons mentioned is that the belt material does seem to attract cat/dogs hairs, and might ‘fuzz’ a bit with repeated wear.
Overall, the Arcade Heavy Duty Elastic Web Belt is a stylish and affordable choice to keep your pants, any hiking accessories, firmly in place. It’s not the most heavy-duty belt on this list, but for the average day hiker, it should offer more than sufficient support.
PROS
- Elastic Nylon Webbing
- Stylish design
- Machine washable and dryer-proof
CONS
- The material might ‘fuzz’ with repeated wear
- Not the most heavy-duty belt
[fl_builder_insert_layout id=”19993″]
Best Budget Hiking Belt
5. Hoanan Tactical Nylon Belt 2-Pack
[amazon box=”B07Q4MJBD7″]
You simply can’t beat the value of the Hoanan Tactical Nylon Belt 2-Pack. Though this set of 2 tactical-style hiking belts is super affordable, it doesn’t compromise on quality: making it simply a steal at the price listed.
YKK Plastic Belt Buckle
Each belt in the Hoanan Tactical Nylon Belt 2-Pack also comes with a non-metal, YKK clip plastic buckle. This makes the design extra attractively for those with metal allergies, or hikers that zip through airports a lot: as the plastic will not trigger any security devices. The YKK branding on this non-metallic buckle also ensures a high-quality standard of production.
A Fantastic Budget-Buy
The Hoanan Tactical Nylon Belt 2-Pack also has great user reviews to back up its quality, comfort, and value. Other hikers say they were surprised at the sturdiness and great grip of the lightweight plastic buckle. Confirming that for a budget-buy, this belt set certainly exceeds expectations. With literally no negative reviews at the moment of writing, it’s hard to fault this outstanding value-for-money set.
PROS
- Cheap!
- Metal-free buckle
- Nylon webbing
CONS
- Not the highest-quality, heavy-duty support and construction
[fl_builder_insert_layout id=”19993″]
Verdict
We guarantee: each product on this Best Hiking Belt overview will hold up your hiking trousers with ease! However, some offer slightly more performance than others. Which product is best for you, completely depends on where and when you plan to wear the belt. For die-hard hikers who want maximum performance, grip, support, and durability, the Cobra 2-Ply Quick Release Klik Belt is a heavy-duty match.
Winner
[amazon table=”12834″]
Considering functionality, price, durability, and performance, the Arc’teryx Conveyor Belt is our winner.
The product’s quality is backed up by lots of glowing customer reviews, confirming it lives up to the quality standard Arc’teryx is known and respected for. The design is lightweight enough so it won’t weigh you down on the go, yet durable enough to keep everything firmly strapped in place, which is a winning combo for us.
Best Hiking Belts FAQ
To help you better understand the different factors to consider when buying a hiking belt, we’re answering the most frequently asked questions on this topic. Learn what to look out for when shopping for hiking and trekking belts, and discover more about what kind of belt will suit your needs best:
What is the best type of hiking belt material?
Though there are some exceptions, most hiking belts are made of canvas, polyester, nylon. Each material has its specific characteristics:
Canvas Hiking Belts
Canvas is often affordable, making canvas hiking belts ideal for those on a tight budget. Though this material is durable and easy to clean, it also tends to absorb water. Meaning that when you’re caught in a downpour, it might ‘soak up’ rain, without the ability to dry quickly. This is why it’s not the most preferred material of choice by experts, but it nevertheless will get the job done and hold your shorts up in style.
Polyester Hiking Belts
Polyester is one of the most common materials used in hiking belts by outdoor brands. It’s lightweight, durable, water-repellant, and sturdy enough for daily wear. Water-resistant polyester webbed belts are comparable to the types of straps you’d find on a backpack, only thicker and more durable. If comfort is a main priority, look for a polyester belt with elastic webbing, as often this material can feel a bit ‘stiff’ until broken in.
Nylon Hiking Belts
Nylon is quite similar in characteristics compared to polyester. Nylon is affordable, water-repellent, and very durable. Though an added benefit of nylon is its flexibility: with stretchy webbing that doesn’t require a break-in period to make it “fit your body” comfortably. Another perk of (elastic) nylon is that this belt material can be easily disinfected (unlike canvas or leather), making it a preferred choice for hunting and fishing enthusiasts.
What is the best type of belt buckle?
Hiking belts can come with a variety of buckle types. The most common options are:
Tongue Buckles
This is the most common type of closure used in luxury leather belts, dress belts, and casual belts. This classic buckle closure is sometimes also used for hiking gear. The design is simple and features a frame, bar, and prongs. There are single-side tongue buckles (the most basic style), and double-sided tongue buckles (with two prongs for extra grip and hold).
But if we’re being completely frank, we think this type of closure is more suited for leisurely use than intensive, heavy-duty hiking. It simply lacks the durability and performance of other types of belt buckles and is more prone to wear and tear with repeated usage. Therefore, we wouldn’t recommend you to select a hiking belt with this buckle style for your outdoor activities.
Clamp Closure Buckle
A clamp closure is a style of buckle that features two parts attached to a belt. One part is larger, the other smaller: allowing them to ‘latch’ together to provide a secure hold. Easy to use, solid in grip, and durable, this buckle is great for hiking belts.
Quick Release Buckle
This style of buckle is all about safety. A hiking belt with a quick-release belt buckle usually doesn’t contain any holes. Instead, the buckle consists of two parts that ‘click’ together to create a durable hold. To unfasten, simply press the release pins and the buckle will instantly spring open.
Flip Closure Buckle
This buckle uses a special ‘flip flop mechanism’. Hiking belts with flip closures don’t have any holes. Instead, the flip closure buckle uses special teeth at the underside to grip the fabric when you ‘flip’ the top part. Which securely holds the belt in place. This type of buckle is mostly used in fabric and canvas belts. Though a convenient, easy-to-use style, a flip closure can be prone to a bit of wear and tear. And also may damage the canvas or fabric of your belt after extensive usage.
Webbing Buckle
A webbing buckle belt features a simple loop at one end. To secure the belt in place, simply put the non-buckle end of the belt through the buckle loop, and cross it back. It’s simple, yet effective.
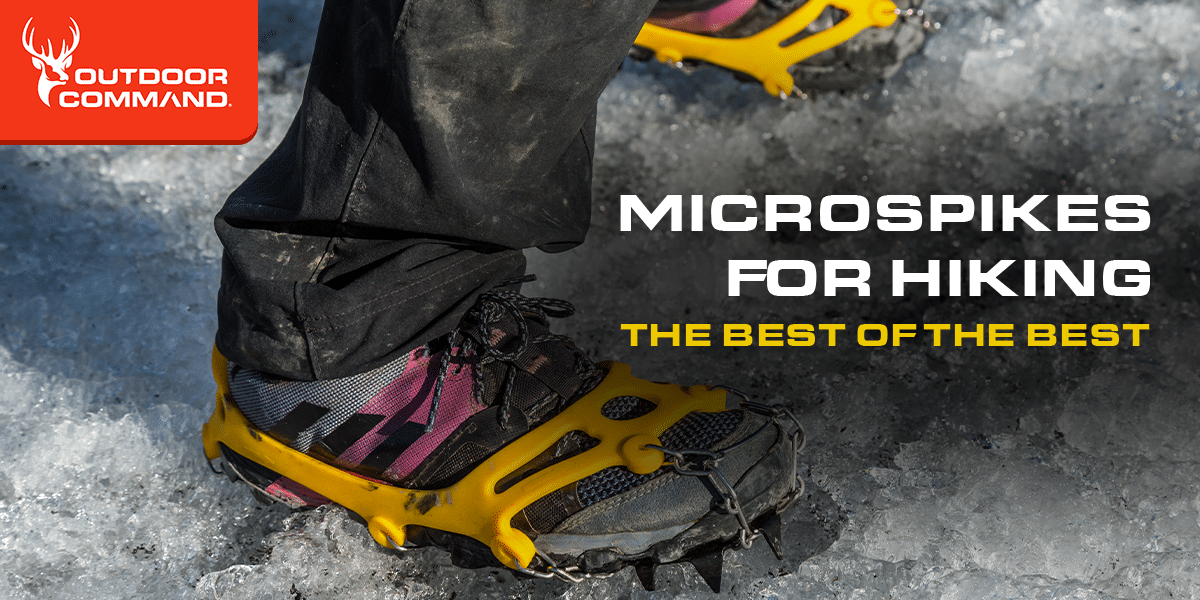
Microspikes make hiking easier.
Hiking is a wonderful activity. It allows us to see beautiful highs and exhilarating lows. From canyon valleys to high-altitude peaks, it’s a great way to see the world and give your body a superb workout. Not to mention a rewarding palate cleanse for your eyeballs. But when the leaves start to fall, and the snow soon after it, most of us turn indoors, find a good book, and wait for the inevitable thaw. Those people are called quitters.
When stepping outside in the frozen months, the slick icy surfaces below can make it dangerous to rove around. Fortunately there are additional devices we can equip to our boots to better combat the conditions. Crampons and microspikes are something you can add to your boots for that added traction when the trails get slick and it’s you want to keep pressing onwards and outwards on the slopes.
Related post: The best dinnerware items for camping
In a hurry? Here’s the test winner after 10 hours of research:
[amazon box=”B00RXXD41E”]
Best Microspikes for Hiking – Overview
And here’s an overview of the best microspikes for hiking on the market today:
[amazon table=”15490″]
To be a 4-season outdoorsman extraordinaire, it’s a necessary pair of equipment to keep you safe and upright. But before we expand beyond what the product is and how it keeps you moving, let’s break down all the essential characteristics of their pointy exoskeleton: from frame construction and points to the bindings, materials, as well as the size and weight and the boot compatibility questions you’re probably holding inside.
Best Overall Microspikes
1. PECO MICROspikes Crampon
[amazon box=”B00RXXD41E”]
Kahtoola microspikes are a great option because they offer super stability and fantastic spike positioning. The material these are made with a heat-treated stainless steel, and the harness holding them together is a superb elastomer as well. The steel chain which connects the spikes provides some awesome durability and reliability to boot. The eyelets are reinforced so you don’t need to worry about them giving out on you mid-trail. Each shoe is strapped up with 12 spikes that are 3/8ths of an inch long.
We also like the variation in weight and size, ranging from extra small to extra large with corresponding weight from 11 ounces to 13.5. Also, you won’t have to worry about these undersides slashing your bag, because they come with a convenient carrying bag. It’s a compact 5x3x2 inch box, so it won’t take up too much time. Additionally, you’re provided a 2-year warranty, so it’s a good way to invest appropriately in a pair of microspikes.
PROS
- The two-year warranty guarantees the product’s quality
- Heat-treated stainless steel means the spikes stay sharp for longer
CONS
- A bit more expensive than some of the other options listed
- Considering the competitors, they are a bit heavier as well
Best Budget Microspikes
2. Crampons Ice Cleats Traction Snow Grips
[amazon box=”B07H4BL4KL”]
If you are on the lookout for added stability to your shoes while hiking, then these traction steel spikes by Cimkiz were explicitly made for providing you with an excellent level of grip and support in your adventures.
Each pair features 19 stainless steel spikes alongside a firm chain system, which is excellent for providing you with excellent traction on a vast range of terrain to keep you safe and injury-free.
Having being made out of thermoplastic elastomer (TPE), you can expect a solid performance in temperatures under -49°F without the risk of damaging, over-stretching, freezing, or flat-out snapping during your expeditions.
If you aren’t planning on hiking, it is also worth mentioning that you can use this product when you go fishing, hunting, running, want to safely walk on icy and frozen roads, mud, and wet terrain.
This particular product comes in 2 different colors – black and orange and three different sizes – medium, large, and X-large, making it suitable for children, adults, and the elderly.
PROS
- It can be used under icy weather conditions
- You can use the spikes for a range of outdoor activities
- Very durable and long-lasting
CONS
- No small size available
- Quite pricey
3. Hillsound Trail Crampon Ultra
[amazon box=”B01DWGTSMO”]
When winter hiking through the backcountry, you’re sure to come across some icy trails. And the last thing you want to do is slip and fall, making it handy to have one of these winter traction devices. And to stay upright on slippery surfaces, the Hillsound Trail Crampon Ultra is one of the best options providing great traction.
Winter trails will feel like a snowless summer walk in the park thanks to the 18 stainless steel spikes that are strapped below you. And with the elastomer harness providing a secure fit, you have no worries beyond what’s for dinner that evening after a lovely day outside. It also comes with a convenient carry bag and a two-year warranty. So it’s not going anywhere, and you can bring it anywhere.
PROS
- Reliable two-ear warranty and 18 stainless steel spikes
- The convenient bag helps you bring it to the campsite
CONS
- A bit more expensive than the other options
- Sizing can be a bit tricky, we recommend sizing up
4. Hillsound Trail Crampon
[amazon box=”B004BN7FDM”]
We love these crampons for their reliability, as emphasized by the two-year warranty they come with. The ergonomic plate system the spikes come with is impeccably designed, and each boot is draped with 11 spikes for superior stability. Also, the front plate is divided into two parts connected by a couple of hinges, which improves flexibility across the front foot.
The harness is designed from an elastomer material, while all the spikes are of stainless steel. The spikes here are long, around 2/3 of an inch, so you’ll get a good grip on any surface. Though with that length comes added weight, and the 16.3 ounces means they’ll be a bit heavier and more costly than competing products. However, all that plus the two-year warranty means you pay for what you get, and this is a reliable product.
PROS
- The flexible front plate for added stability
- Two-year warranty for super reliability
CONS
- A bit heavier than other options at 16.3 ounces
- A bit more expensive as well
5. ICETrekkers Diamond Grip Traction Cleats
[amazon box=”B06Y45MRLN”]
Hikers looking for something to strap to the bottom side of their hiking boots should look no further than this fantastic option from the folks at ICETrekkers. From backpacking through the woods or trekking up icy slopes, the stainless steel spikes on these guys will keep you upright and chugging along.
The spikes can strap onto a pair of winter boots or hiking shoes with the same degree of comfort, thanks to the ingenious sling design that holds the spikes doing together. When you need good traction on those winter hikes, the grippers on these microspikes will keep you safe and secure. We also love that the grip moves in all directions, so they can handle any slush or mud you may come across as well.
PROS
- Steel alloy beads move in each direction for maximum stability
- Tough rubber sling keeps them intact regardless of frigid temperatures
CONS
- Doesn’t come with a warranty
- The steel spikes can wear down quickly on concrete
Bonus Budget-Friendly Option: Yaktrax Pro Traction Cleats Crampon
[amazon box=”B0094GO7CS”]
These are a cool option because they have been made with a different design than the other products listed. Instead of a few specific points digging into the earth below, they are designed with coils for improving traction. The coils are 1.4mm thick steel and positioned in all directions to maximize 360-degree stability.
The harness holding the coils to the bottom of your boot is made with a similarly designed heavy-duty rubber with additional straps. This means it can withstand the same punishment you’re placing on your boots, and the additional straps ensure it won’t wither away under duress. The harness only comes in four available sizes, but the harness is pretty elastic so you can fit it onto your boot easily. Plus the adjustable straps mean even with all the gloves and protective coating you wear, you can adjust accordingly to ensure a safe fit.
PROS
- Steel coils to keep you stable
- Interesting design with adjustable straps
CONS
- Only four sizes available
Bonus Ultralight Option. Kahtoola NANOspikes
[amazon box=”B00TOYEBSK”]
When moving through deep snow in Colorado or ice fishing in Michigan, it’s helpful to have something additional on the underside of your boots. The low-profile of these nano spikes makes them a great choice along the hiking trails when the snow has turned to ice but you still want to get out and enjoy the outdoors. Mountaineering enthusiasts among us will appreciate the lightweight design, as each only runs from 7.2 ounces to 9, depending on the size you select.
Plus a one year warranty means you can bring them on a backpacking trip without worry. While they’re mostly designed for trail running, they are a great option for anyone looking for some extra protection on the trails without so much burdensome weight. So place them on your trail running shoes and get out there today!
PROS
- Minimal and lightweight design
- One year warranty ensures premier craftsmanship and safety concerns
CONS
- Doesn’t come with a tote sack
Our Winner
[amazon table=”15491″]
We love the PECO MICROspikes Crampon because it’s always been one of the more popular products, and with good reason. The superior stability they require as well as the two-year warranty they guarantee means they know their product isn’t going to wear down after just a few uses. Knowing how harsh winter can be, it provides great comfort knowing these guys believe in their product this much.
We also love that it comes with a carry bag so you can lug your stuff around without fear of it puncturing your tent or backpack. For the backpacker eager to set foot in winter, it’s a much welcome benefit they provide.
All in all, adding a pair of microspikes to your winter collection is a great way to stay safe and ensure you can stay outdoors in the coldest months of the year.
Bonus tip: Check out this great video explaining the differences between crampons, microspikes and snowshoes!
Microspikes Buyer’s Guide
What do microspikes do?
Within the microspikes umbrella term, there are several options that you can strap to your boots’ underside. Depending on what you’re looking for, you can either focus on something that improves grip but still allows a normal stepping motion, or something needed to climb steep surfaces with deep indentations. Essentially, microspikes are so helpful for two reasons: they increase traction and surface area.
Of course, the most important characteristic of their ability to stab into icy surfaces with the spikes stopped on them. They’re great for slick surfaces like hiking on icy slick surfaces or scaling alpine ice-covered boulders. And the wider surface area some provide will also be different between staying above the layers of snow and sinking right through them.
What are the different kinds of microspikes constructions?
When talking about frame constructions, there are three main formats. The spike harness can either be fully flexible, semi-flexible or rigid. Because the best option for walking is a fully flexible frame, this is the option that all microspikes first come with. Usually, there is also a hinged bar that connects the front and backplates.
These plates and the hinged bar is great for preventing the accumulation of snow beneath your boot. This snow collection throws off your natural gait and it a helpful way to normalize your motion in challenging terrain. Plus, they work for conventional climbing methods as well.
A semi-rigid frame
A semi-rigid frame combines the two options, that are popular for its versatility. They can come with an adjustable bar to choose how rigid or flexible you want the device to be. And then the most rigid frames offer the best precision. They sit really tight on your boot and offer great support and maneuverability when climbing. Not such a good choice for walking, though.Within the microspikes community, build, fit, traction are the most important considerations of the item’s function. However, we want to start our focus on how easy it is to put them on and take them off.
It’s actually more difficult than you may think, especially when you have numb fingers and the wind is blowing something fierce. It’s just the last thing you want to worry about, and the hassle can become potentially dangerous if you need to get inside quickly. This is something we hope to highlight as we move onto the reviews of the microspikes and something you should keep in mind.
However, one aspect we won’t have to remind you of its importance is the traction of your spikes. You’ll obviously want something that provides the additional traction you need to move around. If you’re just hoping to get to the bus stop on a particularly blustery day, obviously you don’t need something with aggressive spikes. Beyond the spikes and the traction of the product, you also want to consider the build. Even if it’s not such an expensive addition, you still want your microspikes to be able to last you a few winters.
The most important thing is the match the microspikes stiffness with your boots. If your boots bend, don’t get a stiff traction device. It will wear down and eventually break the thing that’s supposed to keep you safe in the blustery winter. Not ideal. What is ideal is to have a good fit between the spikes and your boots. If they wrap too tightly around your boots, they could leave with you with some uncomfortable pressure points on your feet, and something that’s too loose won’t be able to help you as you would like. If anything this will hamper your motion and inhibit your exhibition into the outdoors.

A great pair of microspikes might not let you climb icy cliffs but they will help you trudge through snow hillside mountains.
Aggressive spikes
Something also to consider with your microspikes is how and where are you going to use them. If you purchase aggressive spikes, just know that they wear out quickly on cement, pavement, and other unforgiving man-made surfaces. That leads us to our next consideration, which is where you are going to use them. If it’s just to make sure you’ll stay upright under particularly slick evenings where there could be black ice around, there’s no need to invest in heavy aggressive traction. Minimalist stuff or chains can get you moving with confidence and poise at lighter weights.
If you’re stepping over a frozen pond or stream, you want something that will keep you grounded on the icy surface. These styles will be heavier and clunkier, but obviously worth the unfortunate risk of falling and slipping. Both painful and dangerous, it’s best to keep your butt off the ground and your eyes on ahead, moving forward.
Microspikes, crampons, and snowshoes: what’s the difference?
Just know that just because we’re emphasizing microspikes in this article, that doesn’t mean there is the only option on the table. Microspikes are most effective on slick packed snow or ice. You’re really looking for that extra traction that can keep you on top, but microspikes are nothing compared to crampons.
Crampons are heavier than microspikes because of their larger steel teeth on the toes and base of the boot. Due to their weight, they’re a bit more difficult to maneuver with, and you’ll be stepping slower and getting more tired with them on. They’re helpful when climbing up an ice-covered slope and some equally challenging icy conditions.
And when the ice is still copious amounts of snow, the best options are that with the widest plates of stability: snowshoes. They’re designed to keep you above dry soft snow that otherwise you have you sinking to your knees. If you’re inching along a downward sloping surface, the grippy set of teeth on the undersides can help.

This article is for anyone who wants to know what to pack for their upcoming hike and how to efficiently pack their gear to travel light and get more out of their hiking or camping trip.
An unforgettable adventure to have at least once in a lifetime is a multi-day hike. Maybe you’re thinking about one, or you’ve got plans. Allow us to assist you in selecting everything you’ll need for your upcoming adventure.
Finding the ideal weight-to-equipment ratio when packing a backpack for a multi-day hike entails choosing a few valuable items. In fact, during the hike, anything can happen, so you must be prepared for anything. Because of this, choosing clothing and equipment is a deliberate process.
We’ve put together a guide on what to bring for a multi-day hike that lists all the gear you might need and explains why you need it. Since each experience is distinct and extraordinary, you can modify the list to fit your particular hike, your routines, and your specific needs.
The more frequently you must stop and rest, the slower you walk, and the sooner you are likely to stop and set up camp, the more carefully you must choose your gear and pack it. You’ll typically feel more comfortable on the trail the lighter your pack is.
Before getting to the hiking packing list with all the necessary equipment, let’s review some fundamental concepts. They deal with organizing and planning your trip as well as the items in your backpack:
- Carefully plan and organize your hike; although it takes time and effort to do so, the planning stage can be critical to the overall success of the hike.
- Travel light and avoid carrying extra baggage. Only venture too far if tough enough to endure the barest comfort in a tent during bad weather.
- There are wide price variations, especially in clothing, where higher prices frequently only signify the newest design, color, or fabric rather than improved quality. The best designs are often the cheapest, lightest, and most straightforward.
- Remember to inform someone of your destination and route.
Here Are Essential Hikers Should Bring For A Multi-Day Hiking Trip:
Flashlights
Having to endure darkness at camp and possibly on the trails is a drawback of multi-day hikes. Packing light is almost necessary if you want to safely navigate to your campsite in the dark, cook at night, or take bathroom breaks at night.
Many different flashlights and camping lights are available, from hand-free head torches to lanterns that can light up your entire camp.
It is essential to make sure your artificial lighting will have power. Investing in a solar-powered or hand-crank model may be wise for longer journeys, as battery-operated flashlights can have a limited lifespan.
Sun Protection
Never undervalue the significance of sun protection. Prolonged sun exposure carries several dangers, such as dehydration, sunburns and blisters, and heat exhaustion that can develop into heat stroke. Sunburns, heat stroke, and severe dehydration frequently require medical attention.
On your hike, remember to pack sunscreen, hats, and eyewear. Without adequate sun protection, you risk sunburns that could lead to melanoma skin cancer and cataracts in your eyes.
To shield your head from the sun, put on a hat. Put on long-sleeved clothing with an ultraviolet protective factor, including pants (UPF). To protect exposed skin, use sunscreen with an SPF of 30. Apply once every two hours. Drink more water on hot days.
Camping Toiletries
You’ll need a few things to maintain good personal hygiene while hiking. They include:
- Hand sanitizer and toilet paper
- Moist wipes
- Toothpaste and a toothbrush
- A towel that dries quickly
- Handkerchiefs
You should have these in your wash bag as a minimum, but you are free to include anything else you deem necessary.
A Mini Repair And Multi-Tool Kit
You can fix unforeseen problems like a broken strap, a loose trekking pole, a tear in your backpack, and other things with a mini repair kit while you’re out exploring.
It’s always a good idea to carry multi-purpose tools like a pocket knife, EDC Blot action pen, repair patches, safety pins, or strips of the always-useful duct tape with you, even though the contents of repair kits can vary between products.
Wrapping a lighter in duct tape will keep it close at hand in case you suddenly need it.
Snacks For Energy
Bring enough food for the entire day to keep you satisfied and energized. Take granola bars, nuts, trail mix, or dehydrated meals if you’re on a long hike. Like apples or carrots, solid fruits and vegetables that won’t get squashed in your bag are excellent choices. Or you can always pack a good ol’ peanut butter and jelly sandwich.
While it’s essential to always have enough food on hand, having extra is only helpful in an emergency. Refrain from skimping snacks and nutrition because you’ll burn more calories than usual.
Glock For Any Unwanted Danger
No matter how much research you do or how cautious you are, things can still go wrong. The equipment you brought and your planning before the hike may come in handy.
Utilize your tools to stay as warm, hydrated, fed, and visible as you can. Turn on the locator beacon if you selected it. Use your Glock if necessary, but make sure it’s clean and loaded with bullets to prevent common Glock malfunctions.
See also: How to Plan a Multi-day Backpacking Trip
You should use the whistle you brought. Your location will be made possible by the information you left with a friend or relative.
Wrapping Up
Make sure to make sure your next hike’s packing is smooth. Even though there are six items on this list that are the best for day hikes, you only need the necessities.
Also See: Find the Perfect Hiking Spot for the Ultimate Adventure

TOP-5 Custom Bushcraft Knives That Can Replace a Camp Hatchet

How to Take Your Own Internet to Outdoor Events

Outdoor Event WiFi: The New Backbone of Open-Air Experiences

Gear You Should Snag for the Great Outdoors This Season

Are You Ready for Autumn Adventures? How to Prep for an Unforgettable Outdoor Fall Guys Trip
BougeRV Showcases Sustainable Innovations at Outdoor Retailer Summer Market 2024

The Evolution of Outdoor Apparel: How Fashion Meets Functionality in the Wilderness

The Role of Camouflage in Wildlife Photography and Hunting
How The Annual REI Dividend Works
Spring Camping Must Haves: BougeRV’s CR Pro 30 and Portable Fridge Innovation

The Perfect Heated Clothing for Different Types of Cold Weather

13 Best Hot Springs in Utah

11 Best Hot Springs in Arizona

12 Best Hot Springs in California

12 Best Hot Springs in Virginia
-
 Outdoor Blog7 years ago
Camping Cots and Air Mattresses: What’s Best for You?
-
 Guns & Shooting Gear Reviews4 years ago
Best Gun Brands – Top 10 Gun Manufacturers in the World
-
 Best in Class Reviews4 years ago
The 7 Best Camping Dinnerware Items
-
 Outdoor Blog6 years ago
5 Useful Items To Have When You’re Out On Your Hunting Trip
-
 Best in Class Reviews6 years ago
The 7 Best Fixed-Blade Survival Knives – Tested & Reviewed
-
 Best in Class Reviews4 years ago
7 Great Sleeping Bags for Tall People – 2023 Review
-
 Backpacking Gear Reviews & Guides5 years ago
7 Best Solar Panel Trail Cameras – Reviewed
-
Best in Class Reviews4 years ago
Top 7 Best Microspikes for Hiking – 2023 Review